One of the great things about CIMCO Manufacturing Data Management (MDM) is its ability to organize and present data to the users that need it. Sometimes, the users that need that data are in the best position to capture it. A perfect example of this is setup pictures. An operator can look up their part in MDM and see pictures for the job they are setting up. These can include pictures for part fixturing, origin locations, tool touch off points, as well as anything else critical to achieving consistent results across multiple runs.
The catch is that someone had to take and store those pictures in MDM in the first place. Traditionally an engineer or an operator would take them with a digital camera, upload them to a PC, and then add them via the MDM client. While this works very well, it often requires the person setting up the job to leave the machine to upload the pictures or wait for someone else to upload them for them. What if I told you that you could both take and upload them from a mobile device right into MDM?
In modern manufacturing, mobile devices have become great productivity tools. A great example is the deployment of tablets to manufacturing cells for data collection. CIMCO MDC-Max can use tablets to allow operators to input things like the reason that a particular machine is down without having to leave the machine. Why stop there? We already have the tech, let’s look at a way we can leverage it to make the task of adding the setup pictures to MDM a snap. As long as the device you are trying to use is on the same network as your MDM server, any device with a web browser and a camera can be used to take the setup pictures and import them directly into MDM.

Example image added to MDM using a standard Tablet
There are no apps to download or install, and no configuration is required on the device. Here’s how to set it up.
Step I – Install the Service
From a command prompt or Powershell as an administrator, navigate to the MDM folder. (default is C:\CIMCO\MDM)

Run MdmWebPhone.exe with the install flag. ( .\MdmWebPhone –install)

Click OK. Translates to ‘Service successfully installed’.

Step II – The Firewall Rule
Click on start and type firewall, select ‘Windows Firewall with Advanced Security’

Right click on ‘Inbound Rules’ and select ‘New Rule’

Verify the radio button for ‘Program’ is selected.

Navigate to the MdmWebPhone.exe and click ‘Open’

Verify the path and click ‘Next’

Allow the connection and click ‘Next’

Select which network types the program will be allowed on based on your own environment.

Give the firewall rule a name and click ‘Finish’

Step III – Start the Service
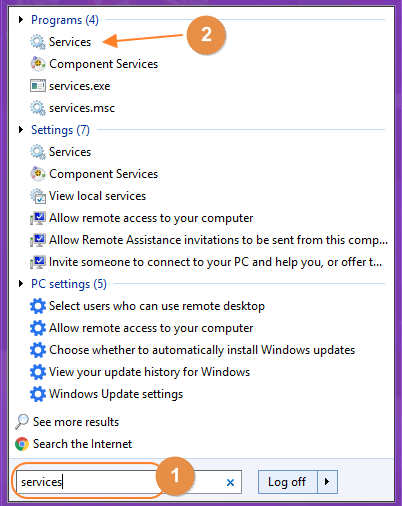
Click on start and type ‘services’ and then click on ‘Services’ under Programs.

Scroll down to ‘MDMphone’ and start the service if it didn’t start automatically.


Step IV – Using a Mobile Device to Add an Image
On the mobile device, open a browser and enter the IP address of your MDM server and port 8889

Touch the white bar and enter the part number you want to add setup pictures for.

Drill down through the levels until you get to your picture folder.


Touch the picture button

Touch the white bar to use an existing picture or touch ‘Take picture’ to add one with the device.

Touch ‘camera’ at the bottom and then take your picture

Once you have a picture, you have the choice to retry or accept the one you took.

Touch ‘OK’ to accept import it into MDM.

If you touch on the image, you can view it right on the device.


Now the operator can view existing pictures and add new ones right from their phone or tablet. Instead of having to print a setup packet, an operator has the ability to view it digitally right at or even in the machine if necessary. Furthermore, if an operator notices something that they feel should be added to the setup pictures they have the ability to add it right then and there without having to stop what they or anyone else is doing. This will result in more complete and easy to follow setup instructions that require less time to create and/or maintain.