Setting Up the Interface between MDM and Mastercam
One of the benefits of CIMCO Manufacturing Data Management (MDM) is that it provides numerous ways to save you time while adding and working with your data. One example is integration with popular CAM software packages.
Today we’ll be sharing how to go about setting up the MDM interface with Mastercam. This gives you the ability to open a CAD or CAM file directly from MDM using Mastercam. You can then edit the part, edit the toolpath, create a new toolpath or whatever else you might need to do and then save it directly back to MDM.
When a file in Mastercam has operations, you can post NC code and then import it directly from Mastercam into MDM and MDM automatically associates it with the file you have checked out. It also allows you to view and print dynamic tool and operation lists in MDM. In our example you will see how to set up the link between CIMCO MDM and Mastercam 2019 but it is possible to do this with Mastercam going back as far as Mastercam X5 or forward with Mastercam 2020 using this guide. While it might look different in the older versions, the functionality and general set up process is essentially the same.
Step 1: MDM configuration
To open the MDM configuration, click on MDM in the upper left corner.

Then click on Database Configuration.

You will find ‘CAD/CAM setting’ under Client Configuration. Choose Mastercam X from the drop-down.

We also need to check the boxes for ‘Enable Mastercam Interface’ and ‘Dialog for CAM-Files’, and browse to the Mastercam executable. The default path is “C:\Program Files\Mcam2019\Mastercam.exe”.

For the next part, we need to make sure that both MDM and Mastercam are closed.
Step 2: File Copy
We need to navigate to the ‘utils’ folder in the MDM install directory. We then want to go into the 2019 folder since we are integrating Mastercam 2019. The default path is “C:\CIMCO\MDM\utils\2019”. (If you are working with a different version of Mastercam, make sure to select the right folder for your version.)

We need to copy “cimcopdm.dll” and “cimcopdm.ft” and paste them into the Mastercam chooks folder.

The default path is “C:\Program Files\Mcam2019\chooks”

Now we need to jump into Mastercam and customize the user interface to include the buttons for MDM.
Step 3: Mastercam Configuration
In Mastercam, right-click in the blank part of the menu ribbon and select ‘Customize the Ribbon’.

Change the drop-down under ‘Choose commands from’ and select ‘All Commands’. Next, click on ‘New Tab’.

We are going to select the tab and rename it ‘CIMCO’ and the group will be ‘MDM’.
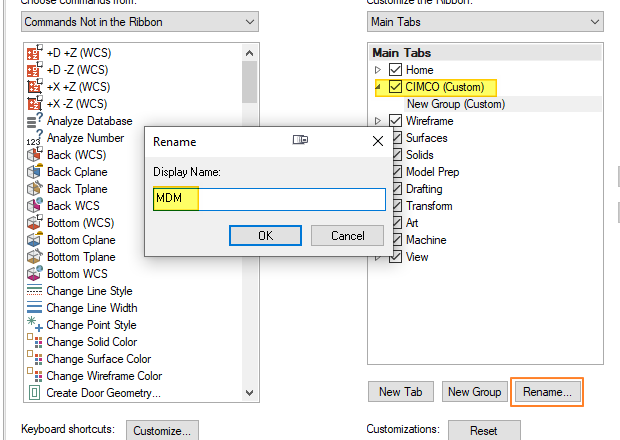
With MDM selected on the right, we want to find ‘Exchange Tools with CIMCO MDM’ on the left and click ‘Add’.

Next, you’ll want to scroll down to ‘Import NC-Files to queue’ and add that one as well.

We wanted the CIMCO tab to be the last one in the ribbon so we’ve selected it and clicked the down arrow to move it to the end of the list.

Then click ‘OK’.
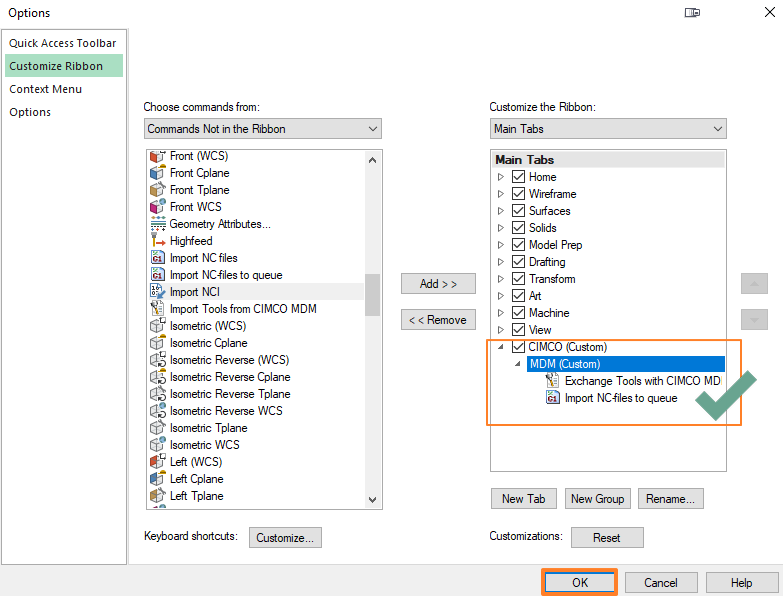
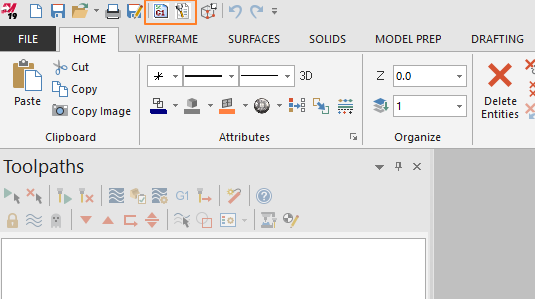
Now we have a CIMCO tab that contains the MDM group with our 2 buttons.

Alternatively, you could add the buttons to the ‘Quick Access Toolbar’ and have access with a single click. We added a couple of separators to make them stand out a bit more as a group.
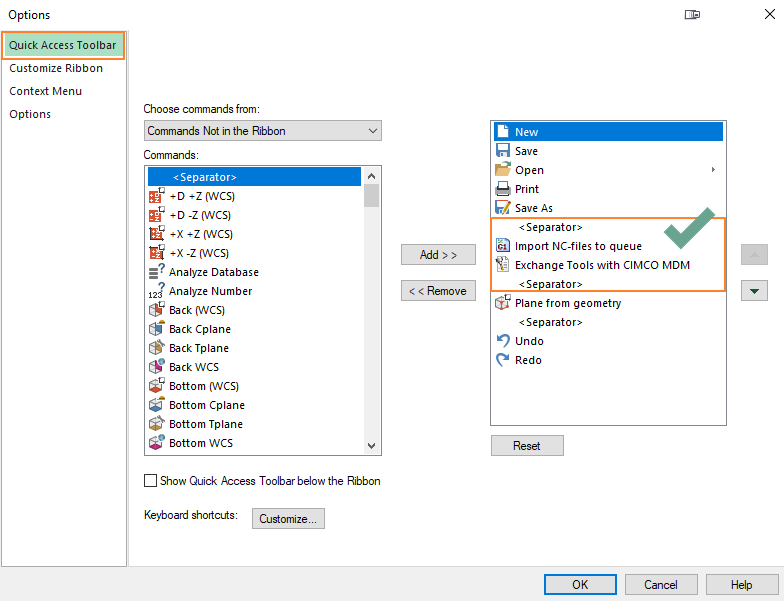
You can now identify the function by the icons.
Step 4: MDM settings INI
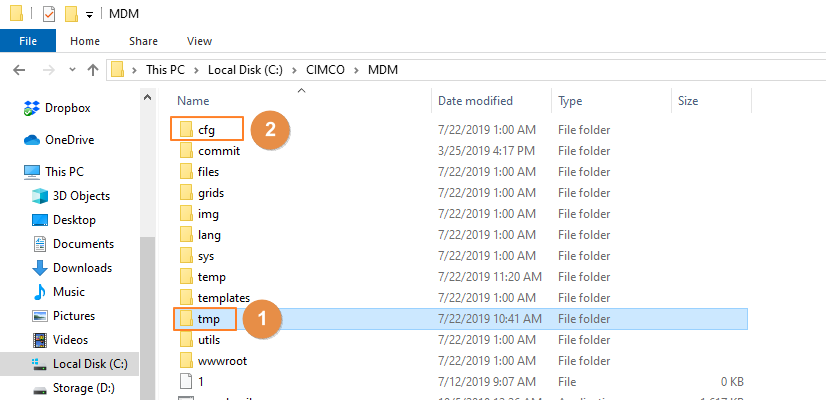
With MDM still closed, we once again need to navigate to the MDM install directory. Once there, we need to verify there is a folder called ‘tmp’ in the MDM folder and then we need to double click the ‘cfg’ folder to get to the settings.ini file.
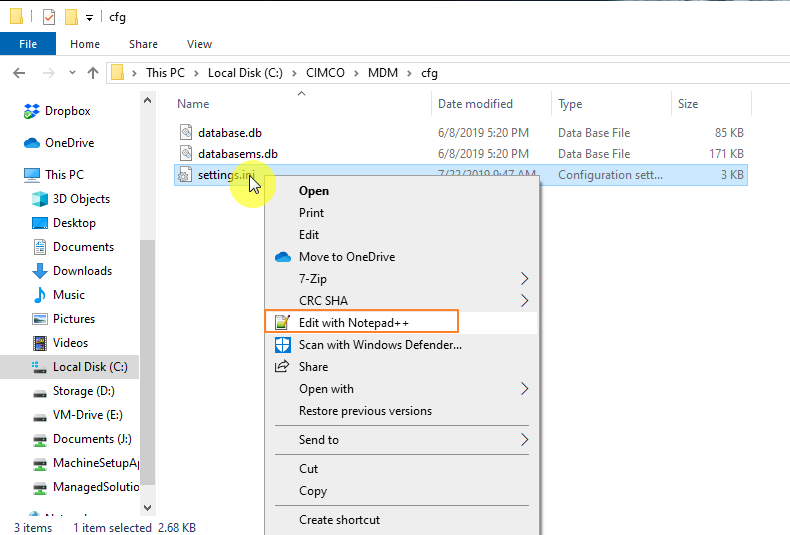
Right-click on ‘settings.ini’ and select ‘Edit with Notepad ++’ if that’s an option or just ‘Edit’ if it’s not.
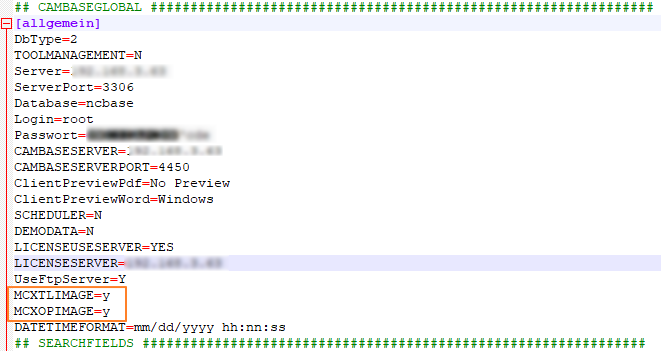
We need to add 2 lines to the ‘CAMBASEGLOBAL’ section of the config. (It should be the top section.) The first is ‘MCXTLIMAGE=y’ (to generate tool images) and the second is ‘MCXOPIMAGE=y’ (to generate operation images).
Next, we need to edit a line in the ‘CLIENTSETTINGS’ section of the config. (Usually the 3rd section.) We need to change the ClientMcxDirectory to ‘c:\cimco\MDM\temp’.
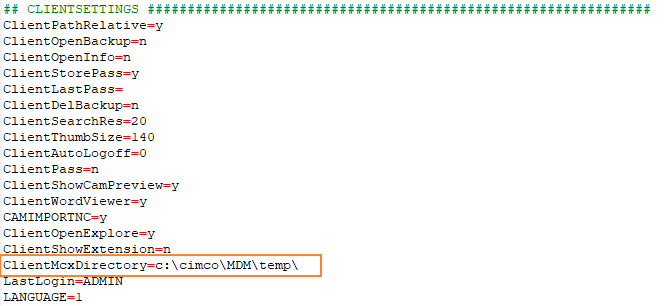
Once we have added the 2 lines and edited the other one, we want to save the file and close it.
There we have it
You can now move files and information fluidly between MDM and Mastercam. In this article, we covered enabling the CAM link in MDM and set it up for Mastercam 2019. We also covered customizing the toolbars in Mastercam to add the MDM group with our two new buttons. While Mastercam is the software I used to demonstrate it, this functionality is in no way limited to Mastercam. There are multiple other options in the utils folder and CIMCO is always working to expand this capability to as many CAM providers as possible. There is still so much to cover that we’re going to split this into 2 parts.
In part two of this series, we look at how to actually use these features to streamline the way we work with files in manufacturing. We will look at setting up the dynamic tool and operations lists so that they will update automatically when the CAM file is changed. We will also look at the process from check-out to check-in for adding a CAM file and an NC-File with tool data included, directly from a 3D model in Mastercam.
Let us know if you have any questions or leave a comment below.
