Since January 1st of 2019, CIMCO has bundled both a single communication port and the license server option with CIMCO Editor for no additional charge. As a result more of our customers are putting the License Server feature to use to float one or more licenses over as many computers as they’d like. Most of this article is pulled from “Getting Started with CIMCO Software Manager” but we like to give our customers one resource to follow when we send instructions, hence this latest article that goes in-depth for an Editor only customer with a CIMCO License Server to setup. Before you do start, we have a couple of quick tips to get the most out of your experience.
Tip #1 – Run Demo Mode and Check Out CNC Calc
This is a biggie, any computer can run CIMCO products for 30 days without a license, you may have known that. What you may not know though, is that CNC-Calc a simple but incredibly useful 2D CAD/CAM software is a part of that demo mode. The feedback we get about this product is stellar, so consider this a tip – try it out in demo mode for free. This might be what you would call an up-sell, but it is one that many of you are likely to thank us for. Sometimes launching and taking up a seat of your CAM software is time and resource consuming. If you need to do a quick inside or outside pocket, you will probably love CNC-Calc for milling. If you want to have continuous cutting for 2D lathe, then you will probably love CNC-Calc. So install CIMCO Editor for all your users, run it in demo mode, and set a reminder in 20-25 days to have your IT guy install and configure the Software Manager so the users will be ready to switch over when the demo mode expires.
Tip #2 – Get the Most Out of Your Editor
We have a great article for users just getting started with CIMCO Editor. It links to several great resources. When you’re done reading this article you may want to check it out.
Those two tips should help you get the more out of your software investment, now let’s get started installing the Software Manager.
Installing CIMCO Software Manager (and License Server)
CIMCO Software manager currently only contains the CIMCO License Manager, during the complete re-work of the licensing system in CIMCO V8 it was plugged in to this new interface. In the future the Software Manager will expand to provide more enterprise management for your CIMCO Software. You will also want this to be a computer that is on whenever users will need to access a license. Also if you did not just purchase the software with a year of maintenance, make sure that you have a valid V8 key file with active maintenance and that you meet the following system requirements:
| Operating system | Windows® Vista, Windows® 7, Windows® 8 / 8.1, or Windows® 10 Windows® Server 2008 / 2008 R2, or Windows® Server 2012 / 2012 R2, Windows Server 2016 or Windows Server 2019 (32 bit and 64 bit versions supported) |
| CPU | Intel® or AMD® Processor @ 1.5GHz or higher |
| Memory | At least 1 GB RAM |
| Hard drive | 750 MB of disk space for the installation of the full suite |
| Display | Monitor with minimum resolution of 1024 x 768 pixels |
| Network | Network adapter with TCP/IP enabled |
| Media | CD-ROM or DVD-ROM drive, or USB port (as needed for software installation) |
| Input | Standard keyboard Mouse with 2 or 3 buttons |
| Software | CIMCO software installation package Microsoft® Visual C++ Redistributables (included within the installer) Microsoft® .NET Framework 4.5 (included within the installer) A valid license keyfile |
Once you confirm your maintenance is active and you have your V8 License File (extension is .CimcoLicense) you are now ready to download and install the CIMCO Software Manager. You can use the download link we provided you when you purchased the software or use our demo form and choose “CIMCO DNC-Max, MDC-Max, and/or NC-Base” which is the second product listed on that form. This could come in handy if you’re that poor IT guy that got stuck installing the software over the weekend.
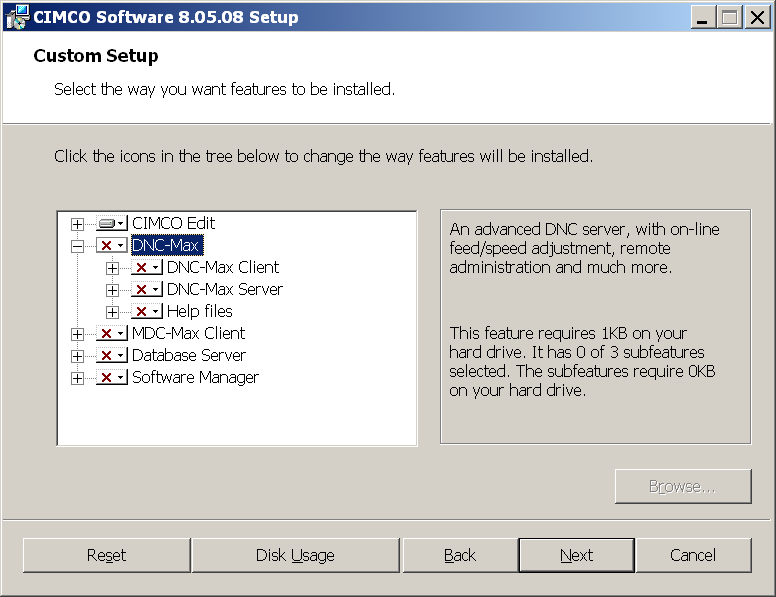
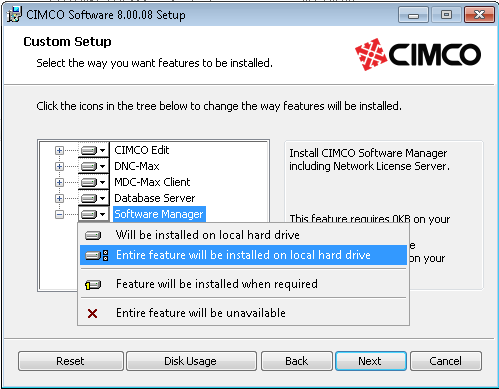
Once downloaded run the installation and choose only the Software Manager (as pictured) “Entire feature will be installed on local hard drive” (set all the other items – Editor, DNC, etc. to “Entire feature will be unavailable”, unless needed for instance if you are installing it on a workstation that will need access to an Editor license) where you want the license server to be:
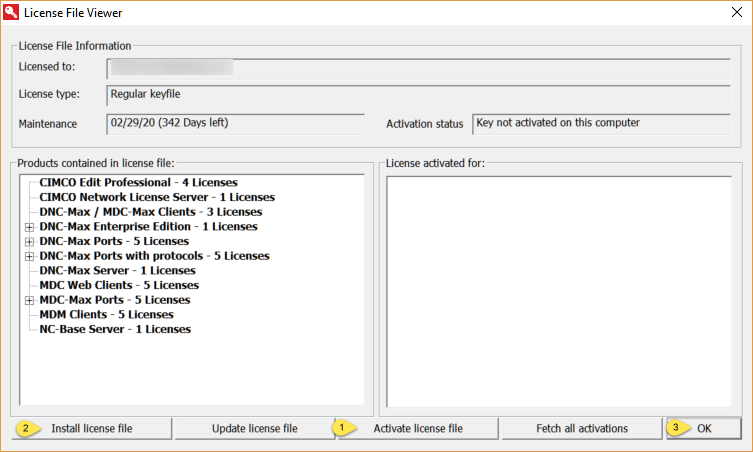
Navigate to your CIMCO V8 License File, double click it to open the license file viewer and choose “Activate” then “Install” in that order:
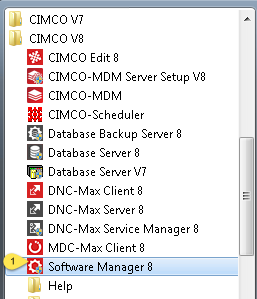
It is likely that you will be prompted to start the service and the software manager will open automatically, if it doesn’t run it from the start menu:
Once running, the dot on the License Server tab will turn green and the interface will indicate that it is started and listening for clients:

If windows firewall is enabled you should get a prompt to allow CIMCO Software Manager to create a rule to allow clients to access it. If something is going to go wrong with your installation this is the most common spot for it to happen.
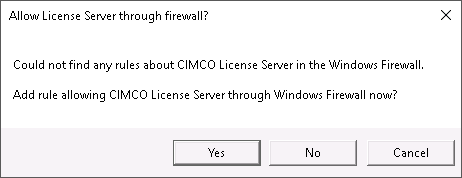
Make sure you click Yes. What if you don’t get this message? You can try closing and re-opening the software manager. If it still doesn’t show up, you will need to allow the program LicenseService.exe from C:\CIMCO\Software Manager on windows firewall.
Your license server is now up and running, licensed products are likely to automatically detect the license server and check out a license. You can watch this activity in the Software Manager.
Troubleshooting Tips for CIMCO Software Manager
If you receive DLL Error 13 when adding the license file, it means that the license needs to be activated. If you do not have internet access on the computer, you can generate an activation request by double clicking the key file and choosing the generate request option. (Sorry for the brevity here, we will provide more details on this issue at a later time). You can always ask us for help.
Installing CIMCO Editor
This is the really easy part and most of you have probably already done this step when you first downloaded the demo. If not you can use the same download from the Software Manager install, just make sure you choose only CIMCO Editor “Entire feature will be installed on local hard drive” and make everything else “Entire feature will be unavailable”. It will look something like this:
When first launching CIMCO Editor with an active License Server on the network, the product is likely to detect that server and check a license out right away. If it does, no further action is needed. If it doesn’t you will get a pop up message prompting you to take an additional step:
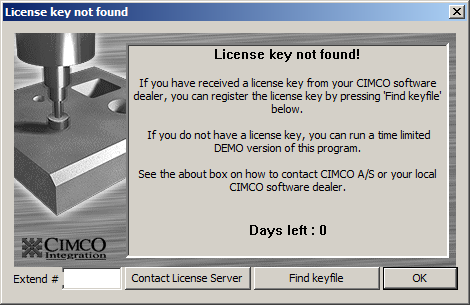
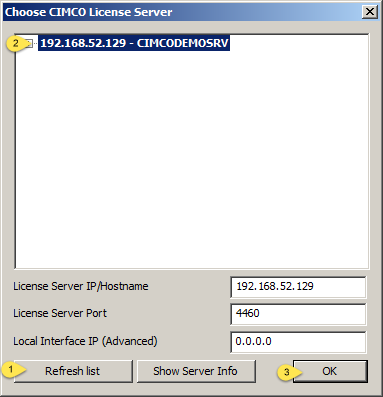
You can now click “Contact License Server” and if nothing shows up “Refresh List” then highlight the server and click OK.
Your Editor should now be started, and on the License Server you will see something similar to this message showing the license checked out.

Now repeat this step on any workstations you wish to give access to CIMCO Editor.
[…] Installing your CIMCO Editor with a License Server […]